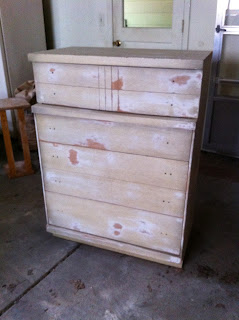
During my day of thrift store browsing, I came upon this Mid-Century dresser that I loved, but at the time I purchased this end table and couldn't fit both pieces in my car. I also didn't have anyone with me to help load it. Even though it was really beat up, I saw the potential and was sad to have to pass on it.
Fast forward two weeks: Ryan and I headed out looking for furniture, and it was still there! Even better- it had been marked down over half off the original price! Yes, it was missing some hardware, but it was solid wood and the MCM style I can't get enough of. I was very glad I was able to get it and at an even better deal than if I would have bought it before.
Again, I started sanding away before taking a real "before" picture. It didn't look THIS bad when I first picked it up.
The biggest issue with this piece was that it was missing hardware. I LOVED the hardware that was on the lower drawers, but there was one piece missing and I could not find a matching piece after scouring Ebay for a couple of days.
I had to go with Plan B. I decided to use the original remaining hardware for the top drawers and find new hardware for the bottom drawers. I definitely didn't want brand new hardware- it had to be "vintage" to match the style of the dresser. I ended up finding two sets on Ebay that I thought would work well, so I purchased both. I figured I could hang on to the extras to use on other projects later.
This was the first project where I was changing hardware and had to fill holes
and drill new ones. I found I am pretty good at filling the old ones-
you would never know they were there. I need to work on my drilling
technique though, as there was some splitting on the inside of the drawers where I drilled. Luckily you don't see that part!
Now that I had my hardware, I got to work sanding and priming the dresser. Then I got stuck. I debated for two or three days over what color to paint it. I really loved how the Hummingbird Blue looked on the end table, but at the same time, white is classic and goes with everything, which could make it easier to sell. Finally, I gave in to my gut and went with the blue. I bought a chrome spray paint for the hardware and it turned out amazing!
I was SO happy I went with the blue. Yes, white would have looked fine. But the blue with silver was just perfect for this piece. And I couldn't be happier with the hardware!
This dresser got lots of interest right away on Craigslist, and after passing on a low-ball offer (annoying!) I sold it to a girl who goes to GVSU and was very excited to have it.
One of the best things about this piece for me was that my dad took a look at it and told me that he was impressed with my painting skills. That meant a lot to me because my dad is Mr. Handyman and he can fix, build or paint anything! As any furniture painter will probably tell you, the most important part of getting a smooth finish is the prep work. Although many people loathe sanding, I actually enjoy it. Now, I probably would hate it without my trusty palm sander, but that tool makes it so easy to get the perfect finish. I also rely on Elmer's Wood Filler to help fill any gouges that are too deep for sanding alone. It is so much easier to paint when the surface is completely smooth!


This dresser is gorgeous and I must tell you that I have one just like it but mint green that was handed downt to me and I have looked online for weeks to find information about it. Do you know more about this piece? Mine has divided drawers! May I ask how much you paid for this? I am looking to sell my piece but have no idea where to even start the price! Thanks so much
ReplyDelete